You will need:
- a 1/4 of a metre of your favourite coloured fabric. I'm using cotton today but satin works just as well
- a pair of sharp scissors
- glue gun and some hot glue melts
- needle and matching thread
- buttons to match your fabric
- a 12.5 inch long piece of spandex lace (available at most crafting shops)
- a 5.5 inch long piece of elastic
- 2 x 5cm pieces of matching ribbon
- a coffee cup (empty of course)
Trace around the brim of your coffee cup onto the back of your fabric 20 times and cut out your circles...these circles will become the petals of your flowers; there are two flowers to this type of headband with 10 petals on each flower.
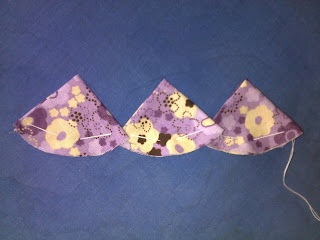
To make your petals, take a circle and fold it in half. You can iron the crease to make things easier
Fold in half again and iron your crease
Do this with all the remaining petals
Take your needle and thread and pop two stitches along the bottom of one petal
Do this about a 1/4cm in from each edge and a 1/2cm from the bottom edge
Do this with 9 more petals and tug the thread as you go so your flower begins to take shape
Your flower should look like this!
Once you have threaded all 10 petals on, pop your needle through the petal you started and tug on it gently with to close the flower
Run a stitch or two back and forth through the two petals to secure it, then stick your needle down through the fabric and tie a knot on the back
 Repeat the process to create your second flower. They should look this this: |
 Glue your buttons on over the centres of your flowers Take your 12.5 inch long piece of spandex lace and stitch your 5.5 inch long piece of elastic to each end of the lace. Be sure to stitch it on securely so it won't come loose. Take one of your 5cm long pieces of ribbon. Wrap it and glue it down over the stitching on your headband. Repeat on the other end. Have a play around and decide where you would like to position your flowers on your headband. Once you have them where you'd like them, use hot glue to attach them to the headband. Cut out two small circles about 7cm wide and use these to glue over the lace on the back of your flowers. And there you have it! Your very own fabric flower lace headband! For personal use only though please, I'd appreciate it if you didn't sell items made from this tutorial; it's just courtesy :) I would love to see everyone's headbands! If you email your photos to me at SewSweetHandmade@gmail.com I will feature them here on this blog! This is my very first ever tutorial so if I have missed something, or you would like to ask a question...please don't hesitate! :) |
Enjoy! xox


No comments:
Post a Comment
Thanks a bunch of bananas for the comments lovelies! I sure do appreciate it you spunky thing you :o)