Welcome to my first crochet tutorial!
I really never thought I'd be able to crochet...let alone coming up with a pattern and turning it into a tutorial/pattern for someone else to follow! Needless to say that the whole process seemed a bit daunting but I still really wanted to give it a try. I should probably mention that I've literally only learnt to crochet in the past two months or so, I'm definately no seasoned expert BUT in that time I have been learning quickly and coming up with a few of my own things already (you may have followed my learning process and seen some of my creations) so if you're new to this (like me) then this craft-a-long will be perfect for you; we can learn from each other! This is my very first time publishing/writing out a crochet pattern so pretty please be nice to me! I have tested this, I wrote it out as I went with a practice beret and corrected anything that seemed out of place.
I really never thought I'd be able to crochet...let alone coming up with a pattern and turning it into a tutorial/pattern for someone else to follow! Needless to say that the whole process seemed a bit daunting but I still really wanted to give it a try. I should probably mention that I've literally only learnt to crochet in the past two months or so, I'm definately no seasoned expert BUT in that time I have been learning quickly and coming up with a few of my own things already (you may have followed my learning process and seen some of my creations) so if you're new to this (like me) then this craft-a-long will be perfect for you; we can learn from each other! This is my very first time publishing/writing out a crochet pattern so pretty please be nice to me! I have tested this, I wrote it out as I went with a practice beret and corrected anything that seemed out of place.
Right, enough of my trying to reassure myself...let's start the project!
NOTE: PLEASE do not sell this pattern or alter any part of it, or sell items created from this tutorial. After making my first crochet tutorial, and putting many many hours into it I can fully appreciate the amount of effort that takes to put one of these together and would hate for someone else to take the credit for all that work. You're welcome to make as many as you like for personal or gift use though of course :)
Crochet Beret Tutorial
For this project you will need a size H hook (5mm) and 3 different colours of worsted weight yarn. I've chosen a grey, a violet and white for my beret and I've tried to stick with some lighter colours so you can see the progress in the photos if you get stuck. You suprisingly won't use up a lot of yarn with this project, my 3 balls of yarn are leftover from other projects, there's probably half a ball of white, and less than half a ball of my grey and violet.
The stitches we will be using for the beret are:
Half double crochet (hdc)
Chain stitch (ch)
Slip stitch (sl st)
Increase (Inc)
You can find how-to videos on the basic stitches here if you need them. I used these videos when learning to crochet, they are very easy to follow. I have inluded in GREEN the amount of stitches you should have at the end of each round. You can give or take 1 or 2, the pattern is very forgiving and you won't notice them in the end.
Beret - Part One
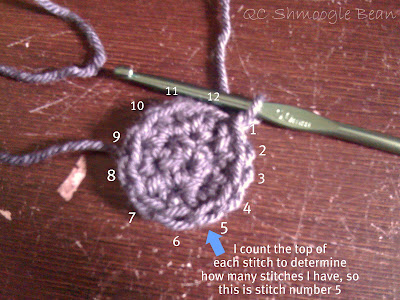
To start make a magic circle, ch 1 then work 6 hdc into the loop, join with a sl st into 1st stitch. Ch 1.
Round 1: 2 hdc in each stitch, join with sl st. Ch 1. 12 stitches
 |
| End of round 1 |
Round 2: 1 x 1 hdc in same st, then 2 x hdc in next st. 1 x hdc in next st, then inc (2 hdc in same st) Repeat til end of round. Sl st to join, ch 1. 18 stitches
 |
| When you reach the end of a round, you will notice there is a gap, count up 3 stitches and out your joining slip stitch into the 3rd stitch (that is the stitch you started with) |
Round 4: 1 x hdc into same st, 1 x hdc in next 2 sts then inc on 4th st. Repeat til end of round. Sl st to join, ch 1. 30 stitches
Round 5: 1 x hdc into same st, 1 x hdc in next 3 sts then inc on 5th st. Repeat til end of round. Sl st to join, ch 1. 35 stitches
Round 6: 1 x hdc into same st, 1 x hdc in next 4 sts then inc on 6th st. Repeat til end of round. Sl st to join, ch 1. 43 stitches
Round 7: 1 x hdc into same st, 1 x hdc in next 5 sts then inc on the 7th st. Repeat. Sl st to join, ch 1.
49 stitches
 |
| End of round 7. You should have a circle roughly 6 inches wide. |
55 stitches
Round 9: 1 x hdc into same st, 1 x hdc into next 7 st, inc on the 9th st. Repeat. Sl st to join, ch 1. 60 stitches
Round 10: 1 x hdc into same st, 1 x hdc into next 8 sts, inc on the 10th st. Repeat. Sl st to join, ch 1. 67 stitches
 |
| You're now finished using your first colour! You should have an 8 inch circle (roughly, doesn't matter if it's not exact) |
Beret - Part Two
Round 11: With your new colour joined onto your circle, you will continue to increase the size of your beret. 1 x hdc into the same st (that you just added your new colour onto) then 1 x hdc into the next 9 sts increasing on the 11th st. 71 stitches
 |
| Beginning of round 11. Repeat until end as with previous rounds. |
Round 13: 1x hdc into same st, 1 x hdc into the next 11 sts. Inc on the 13th st. Repeat til end of round. Sl st, ch 1. 82 stiches
Round 14: 1 x hdc into same st, 1 x hdc into the next 12 sts. Inc on the 14th st. Repeat til end of round. Sl st, ch 1. 85 stitches
Round 15: 1 x hdc into same st, 1 x hdc into the next 13 sts. Inc on the 15th st. Repeat til end of round. Sl st. 91 stitches
Beret - Part Three
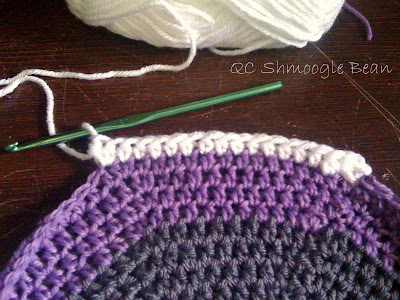
Ok so now we're going to change to our third colour. Use the video provided above to guide you through the process if you need to recap. I'm using white as my third colour.
 |
| Adding in your third colour and beginning round 16 |
Round 16: 1 x hdc into same st, 1 x hdc into next 14 sts. Inc on 16th st. Repeat til end of round. Sl st, ch 1. Now, it would appear that I have miscounted my stitches somewhere along the way, or lost or added a few (whoops!!) so I'm not going to keep counting the stitches, I fairly sure you've gotton the hang of it by now :) As long as it still looks like a circle you're doing fine.
Round 17: 1 x hdc into same st, 1 x hdc into next 15 sts. Inc on the 17th st. Repeat til end of round. Sl st, chain 1.
 |
| You will have something that looks like this! It should measure about 12 inches across the middle. |
For rows 18 and 19 you're just going to put 1 x hdc in each st around in the same colour you're using. (bet it feel good to stop counting!!!) Your hat is now roughly 13 inches across. It's not going to fit on your head as it is so we need to start making the opening smaller so that the beret begins to take shape and fits comfortably.
Row 20: Change your yarn back to your first colour (mine is grey). 1 x hdc in every second st around. Sl st. Fasten off thread.
Row 21: Change yarn to the second colour you used (purple). 1 x hdc in every st around, sl st. Fasten off thread.
Row 22: Change to your third colour yarn (white). Repeat row 21.
Row 23: Change to your first thread again and repeat row 21. This should be your last row, it fits my head comfortably at this stage but you may need to add a row or take one off to suit.
 |
| Underside view (complete with all your tails to be weaved in!) |
 |
| Top view |
You will notice you have a lot of tails hanging out of your hat? We need to weave those in and out of the way. I have found that this video here demonstrates the process best. Now, it says to use specific needles for weaving but I just use a regular darning needle with a large enough eye to thread yarn through. I wasn't too specific about where I weaved my needle through, as long as it was through the same colour as the tail and felt firm when gently tugged.
You're onto the last and final step!
Bow - Step Four
You will need:
A length of ribbon in your choice of size/colour/pattern etc roughly 45 inches long
A Safety pin
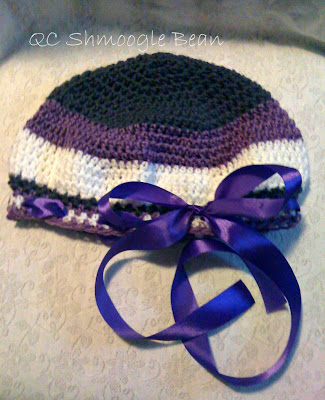
Weaving in your ribbon! For this step you can use pretty much whatever ribbon you like! I absolutely love purple so I've chosen an inch wide bright purple ribbon. Take your safety pin and put it through the top of one end of your ribbon. Weave your ribbon inbetween every second stitch through the second row up from the rim of your hat. Be sure to keep your ribbon flat whilst weaving.
And you're all done!


This is fantastic! your photos are great and I think I could actually make this!!
ReplyDeleteThanks for linking up to Artistic Tuesday
Thanks Amber! Let me know how it goes if you do :) Btw your new hair looks fab!!
DeleteWow, a gorgeous tutorial and I love the beret!! Jxx
ReplyDeleteThankyou Janet :) I appreciate the encouraging feedback! I can't believe how long it took to put together!
DeleteWhat a darling little beret! Thanks for sharing! I found you through your blog post at A Life Full of Laughter - I am enjoying your site very much! Have a fantastic weekend!
ReplyDeleteJeanette
http://jeanette-myownfourcorners.blogspot.ca/
Ohh you read my post!! :) It was my first time guest posting, I hope I did ok with it.
DeleteThankyou for joining my blog, I'll pop and check out yours!
I'm ready to try a beret...Love your tutorial! Thanks for sharing
ReplyDeletehi ... i like your tutorial but i only have question ... what does the >>>> x <<< stands for???
ReplyDelete1 x hdc = 1 hdc
DeleteI apologise, as I said, it was my first tutorial and I wasn't really familiar with the correct way of writing out terminology.
I love this pattern and the colors are great!! I definitely want to make this one. Carol Sweigert
ReplyDeleteThank you so much for posting this i have been looking for a good pattern and this is it :).I'm almost finished with mine.Thanks again
ReplyDeleteThanks for a very clear, and beautifully photographed, tutorial. I will be sure to recommend this to my friends.
ReplyDeleteBrilliant tutorial, I have only been crocheting for a few weeks but I have just followed your instructions and have made my very first beret, thank you for the fabulous clear instructions.
ReplyDeleteLorraine x
I am going to make a lot of these for cancer patients (free of course), I've been there and these are very nice. Yours is very pretty too. Thank you hon. God Bless!
ReplyDeleteAudrey