
Materials
2 coloured balls of yarn for your hat, I am using a pale yellow and purple
a yarn needle for weaving in ends and sewing
scissors
a 5.00mm crochet hook
a small amount of white yarn for the eyes
a small amount of yellow yarn for the beak
two small buttons for eyes!
For the hat
Start with a magic circle, then 6 hdc into the centre of the ring. Join with a sl st into first st. Ch 1
Round 1
Hdc into same st then 2 hdc into each st around. Sl st into top of first st to join.
Round 2
Ch 1, hdc into same st, then 1 hdc into next st. *2 hdc in next st, one hdc in next* around. Join.
Round 3
Ch 1, hdc into same st, 1 hdc in next 2 sts. *2 hdc in same st, 1 hdc in next two sts* around. Join
Round 4
Ch 1, hdc into same st, 1 hdc in next 3 sts. *2 hdc in same st, 1 hdc in next three sts* around. Join
Round 5
Ch 1, hdc into same st, 1 hdc in next 4 sts. * 2 hdc in same st, 1 hdc in next four sts* around Sl st to join.
Round 6
Ch 1, hdc into same st, 1 hdc in next 5 sts. *2 hdc in same st, 1 hdc in next five sts* around. Join
Round 7
Ch 1, hdc into same st, 1 hdc in next 6 sts. *2 hdc in same st, 1 hdc in next six sts* around. Join
Round 8
Ch 1, hdc into same st, 1 hdc in next 7 sts. *2 hdc in same st, 1 hdc in next seven sts* around. Join, finish off.
 |
| What you will have at the end of round 8 |
Rounds 9 through 15
*1 hdc in every st around* Join. DO NOT tie off

Earflap 1
Ch 1, hdc across 14 sts. Ch 1, turn.
Skip next st, hdc across 12 sts. Ch 1, turn.
Skip next st, hdc across 10 sts. Ch 1, turn.
Skip next st, hdc across 8 sts. Ch 1, turn.
Skip next st, hdc across 6 sts. Ch 1, turn.
Skip next st, hdc across 4 sts. Finish off.
 |
| To start second earflap, count across 10 sts and join yarn. |
For second earflap, count 10 sts from first earflap and join yarn in 10th stitch.
Ch 1, hdc across 14 sts. Ch 1, turn.
Skip next st, hdc across 12 sts. Ch 1, turn.
Skip next st, hdc across 10 sts. Ch 1, turn.
Skip next st, hdc across 8 sts. Ch 1, turn.
Skip next st, hdc across 6 sts. Ch 1, turn.
Skip next st, hdc across 4 sts. Finish off.
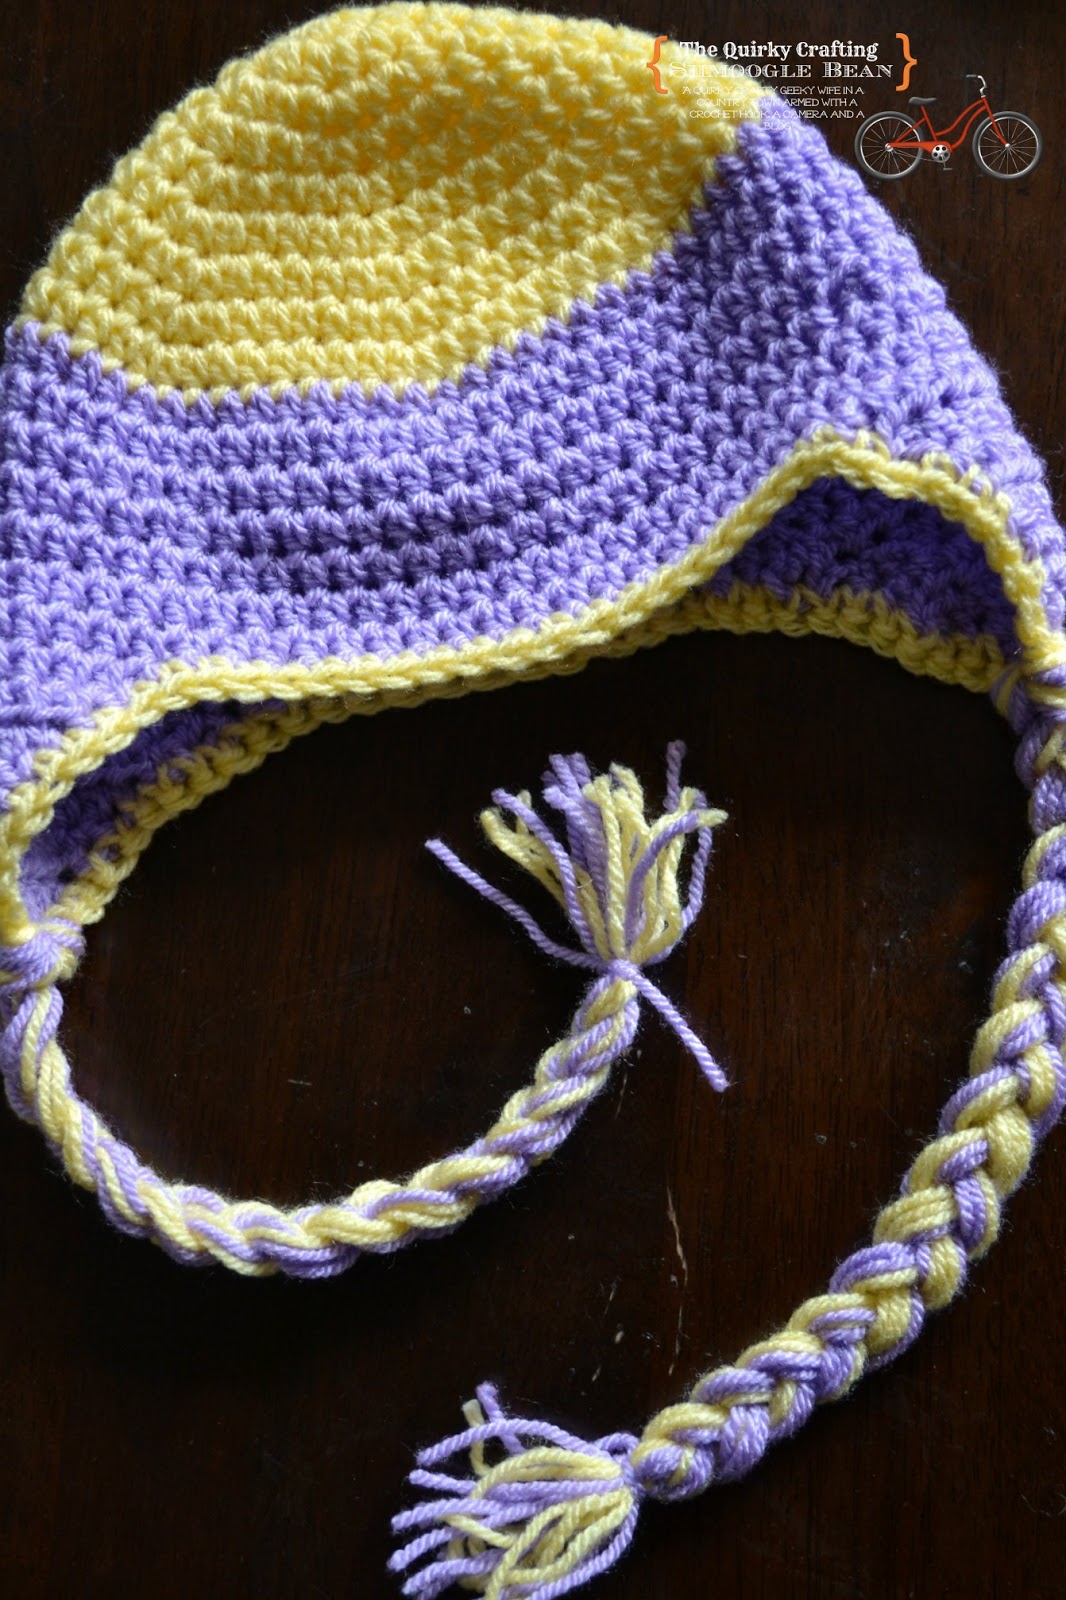
Finishing the hat
Take your first colour and sc all the way around the bottom of your hat. Weave in all your ends.

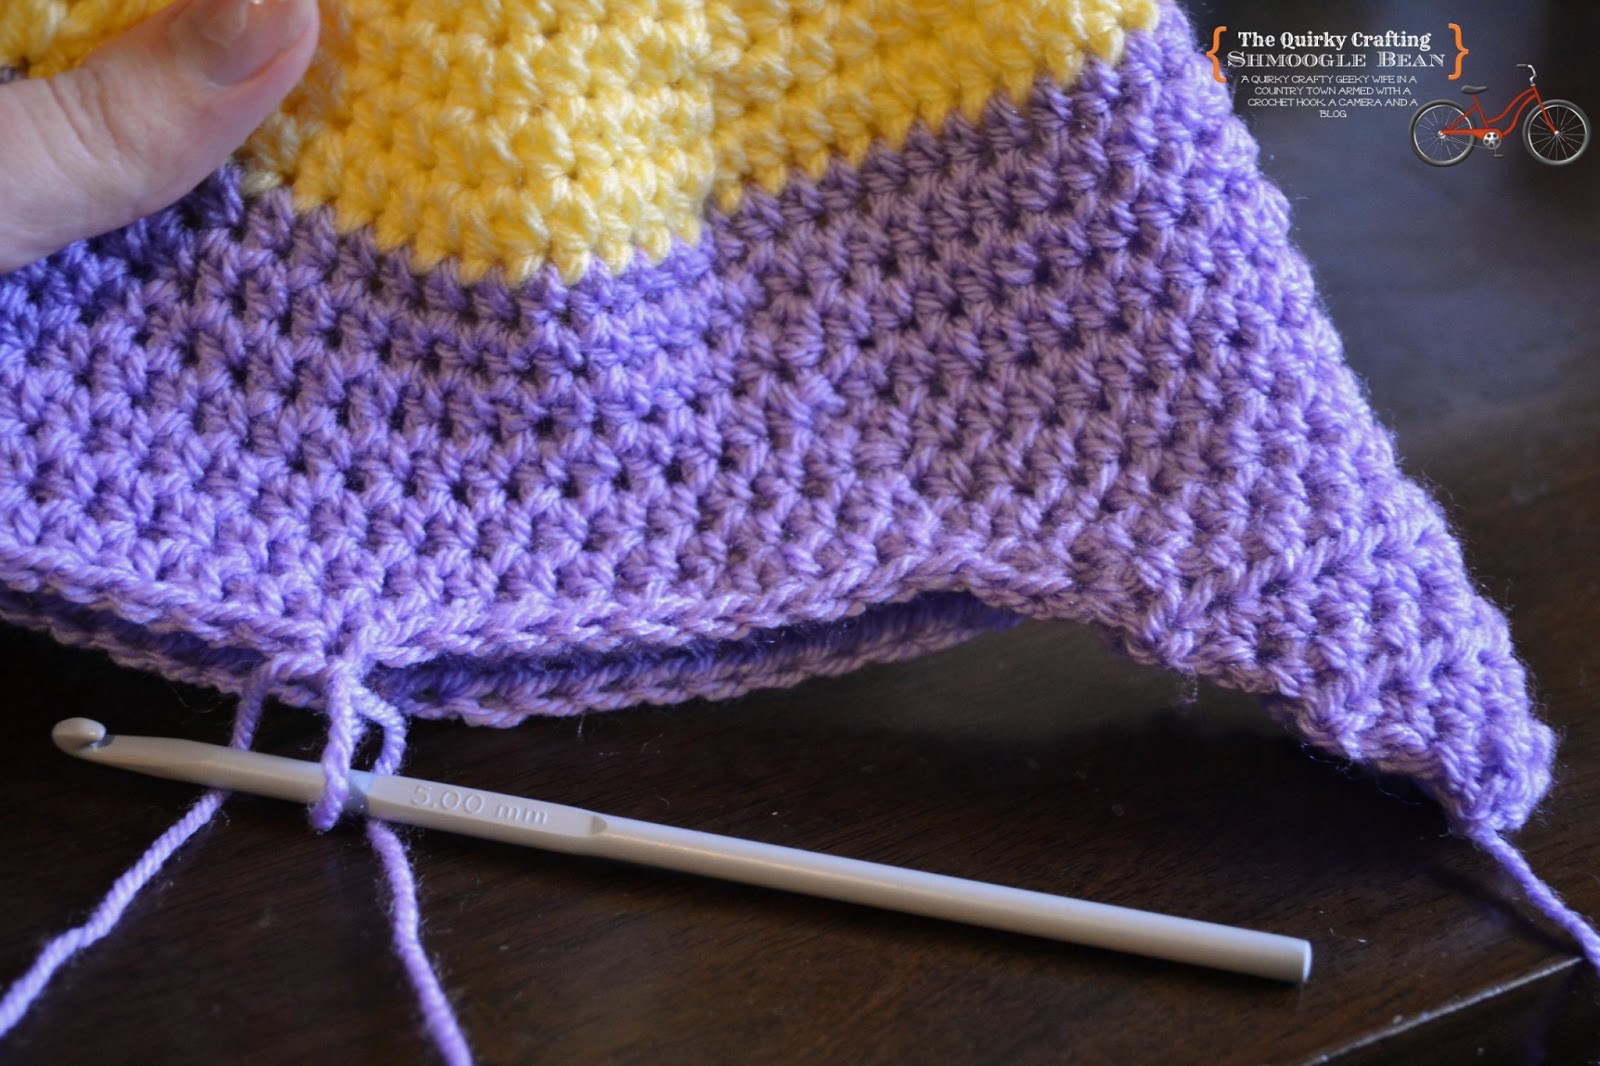
For the tassles
Cut 10 x 60cm lengths of yarn in each colour. Seperate the yarn into two halves. With your first bundle of yarn, attach them to the earflaps as shown.
 |
| Place crochet hook through the middle hdc on the bottom of one earflap from UNDER the earflap |
 |
| Fold your first lot of yarn in half over the crochet hook and pull taut. Pull hook through stitch to create a loop |
 |
| Bring the tail through the loop and pull gently to secure. |
For the eyes
Take your white yarn and crochet hook and make a magic circle. Work 10 hdc into the ring and join with a sl st. Ch 1 and hdc into same st. Then work 2 hdc into each st around, joining with a sl st at the beginning st to join. On the next round, Ch 1, hdc into same st *1 hdc in the next st, 2hdc in the same st,* repeat til end of round. Finish off leaving a long tail for sewing. Repeat for the second eye.
For the beak
Magic circle, dc, 2 hdc, sc, ch 1, sc, 2 hdc, dc into ring. Pull ring closed tightly, sl st into ring to close. Finish off leaving a tail for sewing.
Arrange your eyes and beak onto hat and sew into place. Sew on buttons.

Done!
I hope you enjoy working on this cute pattern! The best thing is you can make it for girls and boys and the pattern is easily adjusted to fit younger or older children (or even adult size!). If you have any questions, just ask and I'll get back to you when I can!

You're welcome to sell items made from this tutorial, I would appreciate a link back to here though if you'd be so kind..Please do not print then redistribute this pattern; you may not copy this pattern to another site without my permission; pattern is not to be copied/altered/partially reproduced in any way. Photos are all property of The Quirky Crafting Shmoogle Bean.
This is adorable. I wish I was as talented as you :)
ReplyDeleteNaww shucks :o) Thanks!!
DeleteThis comment has been removed by a blog administrator.
DeleteIt is so cute! I just wish that I could do this. Good job!
ReplyDeleteWhy thankyou! That makes me feel all warm and fuzzy :o)
DeleteThanks so much for commenting!
I would love to use this pattern but make a monkey?????
ReplyDeleteI'm really sorry i can't help you there :o) I have a pet-hate for sock monkey hats, they're creepy! lol
DeleteYou could try this one though!
http://knottyknotty.blogspot.com.au/2011/03/free-sock-monkey-hat-pattern.html
Just started following your cute pattern. Why do you have 2 Round 5's, one with "finish off" and the other similar to all the other rounds? It is not a big deal -- it just threw me when I thought I had already worked Round 5 and then there was another Round 5. I hope it is just a typo.
ReplyDeleteMy mistake, just a typo! There is 8 rounds before changing colours, I had just typed 5 twice by accident. I'm not sure why I wrote 'Finish Off' there, I may have misread my notes whilst typing out the pattern.
DeleteThankyou for pointing that out!! :o)
DeleteYour phone takes very good pictures and I have no problems looking at this beautiful hat. Thanks for posting it.
Oh good :o) I was worried I'd have to retake the photos! I'm glad they're ok! And you're very welcome!
DeleteCan u post the pattern but not written
ReplyDeleteNo sorry, I don't make video tutorials.
DeleteThis is sooo cute!!! I'll try making it for my 4month old sweetie :-)
ReplyDeleteNawww :o) I hope she loves it! Let me know if you have any problems with the pattern XX
DeleteNawww and who would of thought if I was reading different blogs I would of come across your one Tash for making this awesome birdy beanie, I love it !!!! I like it better than some of those owl beanies out there but shhhh ;)
ReplyDeleteYou have done yourself proud it is an awesome tutorial, oh except for row 5 hehe which by the way I didn't pick up on while reading through the tutorial it must be crochet nerd in me to miss mistakes lol
Hope you have a great day xx
Hey Vicki! You found me *hides* lol hehehe yes row 5 was a bit disastrous but I have righted that wrong and hopefully the rest makes sense haha I'm fairly new to writing crochet tutorials and this was one of my earlier ones, mistakes are bound to happen when I'm concerned! :o) It's what makes me, me tee hee
DeleteThis is the first time I have see this site through All Free Crochet. I just wanted to tell you that your posted patterns are by far the best I've seen and I'v seen a lot. I'm not a beginner, but I sure wish when I was teaching myself to crocet,that all the patterns were shown like yours. They are very detailed and the detailed pictures are great.
ReplyDeleteSomeone should hire you to write and illustrate patterns. Job well done!
I have been looking for a pattern like this for my teenage grandchildren. They love the animal hats, especially this one. What do I need to do to make it for older children ages 6-16? By the way, your camera takes great pics.
ReplyDeleteI love the pattern. Can't wait to try it.
ReplyDeleteI love this!!! I just started making a hat for my 8 yr old. I would like to make this for him as well. What do you think the alterations would look like for a larger head?
ReplyDeleteThe only thing you would really need to change is the amount of increase rounds you add to the hat. When you get to round 8, instead of switching colours and extending the length of the hat, you would add, for example, another 3 rounds of increase (so Round 9 Ch 1, hdc into same st, 1 hdc in next 8 sts. *2 hdc in same st, 1 hdc in next eight sts* Round 10 so Ch 1, hdc into same st, 1 hdc in next 9 sts. *2 hdc in same st, 1 hdc in next nine sts*) etc. To test the size, simple pop it on top of your son, this section of the hat should cover the crown of his head, then resume the pattern at Round 9 until you have the length of the hat.
DeleteI hope this helps!
It does I think but just for my 'LD' let me repeat . . . I make it the same way and repeat as the increase until it fits?
DeleteThis hat is so cute! Can you tell me how I would adjust it to fit my 23 month old Grandson?
ReplyDeleteThanks,
Grandma Lori
I'm excited to start. Making a few for the church baby shower coming up. I have been crocheting for years and if you could tell me what the "magic circle" is, I could actually make these :)
ReplyDeleteThanks ,
Jessica S
Absolutely LOVE this!! Just tried it and it was easy to follow and my daughter LOVES the final product!! Thank you thank you thank you so much!! :)
ReplyDeleteJust made one for my 2 yr old from the pattern you gave! It was so easy to follow and never confused me 1x which is a HUGE plus!! Absolutely LOVE this!! Thank you thank you thank you so much!!
ReplyDeleteThis hat is sooo cute. I will try to make this but I need to know what is a "magic circle"
ReplyDeleteThanks you.
http://www.youtube.com/watch?v=WLuSVyKvoUg
DeleteThis video on Youtube might help :)
Hello. I love this pattern, and can't wait to make the hat. I am wondering if Australian stitches are the same as US. Is an hdc the same there as in America? Thank you.
ReplyDelete