Showing posts with label Sewing. Show all posts

Tuesday, 14 August 2012

Nappy Wallet Sewing Tutorial ~ Very Handy and Very Cute!

Hey guys! You may remember this tutorial was featured at The Babbling Baby's Blog but unfortunately due to personal circumstances Charlene closed down her website. I was able however to retrieve (luckily!) this sewing tutorial I made up especially for her blog and relocated  back here to the QC Shmoogle Bean! I know a few blogs have featured this tutorial since then, if you are one of those wonderful bloggers, I have emailed you with this link if you'd like to replace it with the old one :o)
This is a gorgeous project to make as a gift for any mother-to-be, handmade gifts have that special personal touch! It takes very little fabric and is not a difficult sewing project; I made one for a friend of mine for her baby shower a few months ago and she just loved it! I hope you will enjoy this tutorial!! *I make no income from my blog and my tutorials are created for free for your personal/gift use only. Please do not sell items made from this tutorial; no part of this tutorial, text or photographs, may be sold, copied or reproduced in any way.Thankyou!


You will need:
Ruler or tape measure
Fabric scissors
Tailors chalk
Sewing machine and matching thread
Hook and loop tape
(2 x 5.5cm loop tape and 2 x 5.5cm hook tape)
Iron
Focus fabric
Lining fabric
Iron on interfacing


Fabric
For the nappy wallet:
1 focus fabric piece 42.5cm x 26cm
1 inner lining fabric piece " "
Interfacing " "

For the inside pockets:
2 focus fabric pieces 12cm x 14cm
2 inner lining pieces " "

For the wrist strap:
1 fabric piece 42cm x 7.5cm

For the closure strap:
1 focus fabric piece 9.5cm x 22cm
1 inner lining piece " "
Interfacing " "
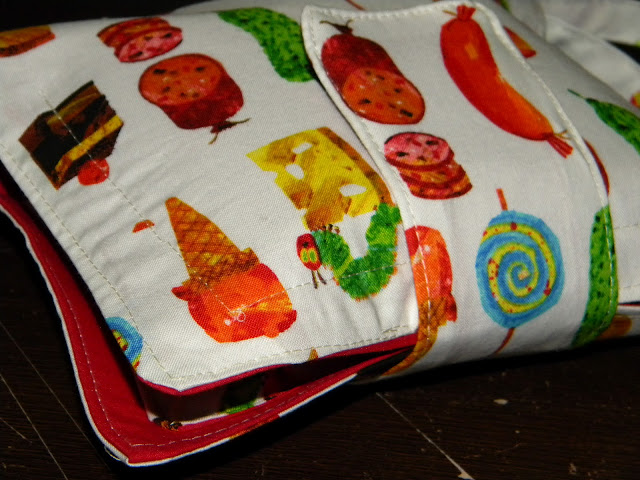
This adorable 'Hungry Little Caterpillar' fabric is from 2 Little Bowerbirds, they stock some absolutely gorgeous fabrics and are an Australian based supplier. Before starting this project, be sure to have all your fabric cut and ready to go and be sure to read through each step before you start :o) I've included plenty of photos to help you along so it should be nice and easy to follow, but if you get stuck at any stage, please don't hesistate to ask me any questions!
Step 1: Iron the interfacing onto your nappy wallet lining fabric. Set aside

Step 2: Iron the interfacing onto wrong side of closure strap lining. Flip over and position both pieces of loop tape side by side in the centre onto right side of strap lining 3cm in from the top as shown. Overlap the tape slightly so it's easier to sew. Pin, and sew.


Step 3: Once your loop tape is sewn on, place the two closure strap pieces right sides facing and pin in place. Sew along the edge using a 1cm seam allowance leaving the bottom end open for turning. Cut a 45 degree angle at the corners close to the stitching, this will give you a nicer corner. Turn the strap right side out, fold in open end 1cm and press. Topstitch all around close to the edge. Set aside.

Step 4: Place one set of your pocket fabric pieces together (1 focus fabric and 1 lining piece), right sides together and sew around the outside using a 1/2cm seam allowance leaving a gap for turning. Turn right side out, fold in opening and press. Do not topstitch. Repeat with your second pocket. Set aside.

Step 5: Take your wrist strap fabric and lay it  wrong side up. Fold in the sides to the centre lengthways and press.

Fold the strip in half again enclosing both raw edges inside. Press. Your wrist strap will be 2cm wide. Top stitch along the open side close to the edge. I like to topstitch down the other side aswell to make it look more finished.

Step 6: Take your two main nappy wallet fabric pieces and place them right sides facing. Pin. Now take your wrist strap and fold down in half. Sandwich it between the two nappy wallet fabrics in the centre leaving 2.5cm of the ends outside as shown. Pin into place. Note: to find whereabouts you need to pin the wrist strap, fold your fabric in half and pin the strap in at the fold. Also make sure your wrist strap is not twisted inside the fabric pieces.

Sew all around the edge using a 1cm seam allowance leaving a 10cm gap for turning. Be sure to sew over the wrist strap to secure it. Trim off excess fabric and cut 45 degrees on each corner. Turn right side out and press the whole thing nice and flat.


Top stitch around all edges, being sure to catch the 10cm opening.

Step 7: Fold your nappy wallet in half. This is what your nappy wallet will look like when closed and is how we are going to position the closure strap. On the back of the nappy wallet, position your strap velcro side DOWN in the centre (about 8cm in from either side and 8cm down). Pin into place.

To attach the strap, sew a square 6cm x 6cm lining up the bottom of the square over the stitching at the bottom of the strap. Sew across from corner to corner. Don't worry, once we place the pockets on the inside of the nappy wallet, you won't see the stitching on the other side.


Step 8: Still with me? :o) Don't forget if you get stuck or have any questions, please don't hesitate to ask! Next we will be positioning the hook tape onto the nappy wallet. Lay your nappy wallet down as shown

Measure in 6cm from the top edge (about 8.5cm in from either side) and this is where you will sew on your loop velcro. Lay your velcro side by side slightly overlapping as before and pin into place.

Sew on your velcro.

Step 9: Take your two pocket pieces and position them at each end of the wallet as shown about 2cm in from each side.

You will be sewing along the sides and bottom edge leaving the opening towards the middle so when you are positioning your pockets, be sure to do so with the gaps you left for turning on the bottom of the pocket so they will be sewn over and closed in the process. Sew around each pocket as close to the edge as possible. And you're all done!! All you need to do now is add some nappies inside, gift wrap it and I am sure the mum-to-be will adore it! The nappy wallet will hold 2 newborn to 5kg nappies in each pocket snuggly plus you could easily fit a folded changing mat and another nappy or two between the pockets when closed.


Friday, 8 June 2012

My first attempt at making a quilt


Today I scrambled through my meagre fabric stash to see what I had in there..I had this brilliant idea that I was going to give a baby quilt/play mat a go today (after finally giving up on the housework. The bathroom is clean, I smell like a Exit Mould) I only had two pieces of fabric large enough to make a quilt with, some green spotty fabric and some dark blue cotton which worked out well because it means now I have a unisex quilt to add to my baby box. I also discovered I had no batting either and being too broke to go buy some more (as usual) I fished out a piece of old pink mink that was faded and used two layers of that instead. And then I set to it! And voila! It didn't turn out so bad :o) The only bias binding I had was 1cm wide and at first I tried in vain to wrap it over the outside edge but as you can guess, that failed. So I cheated and folded it in half and topstitched it on instead! That worked!


The spots made it a bucket load easier for me to sew nice even squares too ( I just had to count between them to get straight lines), I'd have been stuffed without them! Perhaps all my blankets in future will be spotty...


Then for extra measure (and with extra fabric) I put two applique birds on the corner....unfortunately though my sewing machine is very old (A Globe Electronic 390 to be exact) and doesn't really have an applique/embroidery function so I just sort of eyeballed it and used a small zig zag stitch over the edge twice. Some may call it dodgy, I think of it as improvisation! I'm pretty impressed with my handiwork, my sewing machine has been a bit neglected recently (blame Mr Crochet Hook) though it definately has room for improvement next time!

Wednesday, 4 April 2012

Cute Crochet Hook Case Tutorial

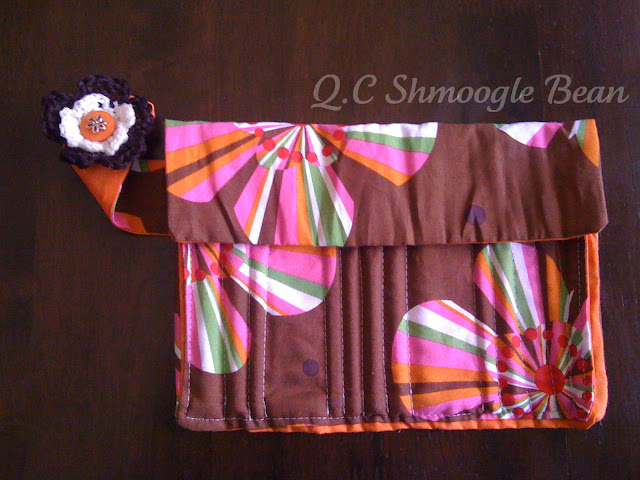
I got tired of storing my crochet hooks back in the soft plastic case they came in and decided I want a funky compact crochet hook roll to store them instead! A whole morning of measuring, sewing and scribbling down my draft tutorial and I've finally finished it! I made mine to fit 15 hooks but you can change your case to suit how many you'd like yours to hold in Step 3. This was really a matter of trial and error, but it all worked out perfectly in the end, I've done my best to make the instructions as simple as possible but if you get stuck or have any questions, dont hesitate to ask! enjoy!! Xx

NOTE: For personal/gift use only! You may not copy/sell/reproduce any part of this tutorial. You may not use photos from this tutorial for any purpose; you may not sell any items made from this tutorial. Please respect the time and effort that goes into the production of free craft tutorials :o)


The finished crochet hook case rolls up 15cm x 4cm, nice and neat!


What you will need:
  • 2 x fabric pieces, one outer, one inner and both 26cm x 26cm (pieces A & B)
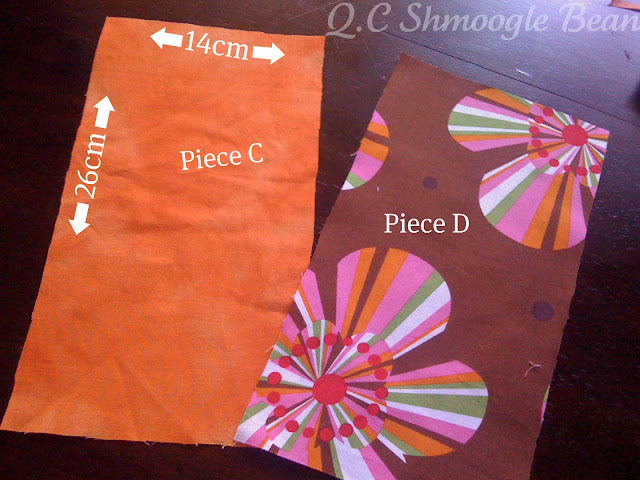
  • 2 x fabric pieces, one outer, one inner and both 26cm x 14cm (pieces C & D)
  • 2 x fabric strips 18cm x 5cm for the strap
  • 2 x pieces of 3.5cm wide standard hook and loop tape (4 pieces in total) all 4cm long. If you have thicker hook and loop tape, you can use that instead of two smaller pieces, Im just using that size as that's what I have on hand at the moment :o)
  • Sewing machine
  • Matching thread (for tutorial purposes I have used blue thread so you can see my stitches)


1. Place pieces C and D right sides facing and sew around the outside using the side of the presser foot as the seam allowance leaving an inch gap for turning.

Turn right side out and press.
Be sure to press after turning right side out

2. Lay it right side up onto piece B about 1/2 inch in on each side to allow for the seam later. Pin into place.
pin in place
Sew around the two sides and the bottom leaving the top open. Sew as close to the edge as you can. NOTE: make sure the gap you left for turning in step 1 is at the bottom you sew over it closing the hole.
sew as close to the edge as you can

3. Next you're going to add the storage spaces for your hooks. As I mentioned, I made mine to fit 15 hooks but with this pattern you can add more spaces to fit more hooks or take some away to fit less. The best way to work out where you spaces need to go and how big they should be, lay all your hooks down and work out how many cm each storage space needs to be and sew one at a time. Place your hook inside to check it fits and continue for the others. I found I needed a 2cm wide space for my 10.00mm hook, 9.0mm and 8.0mm, then 1.5cm gap for 7.00mm, 6.00mm and 1cm for the others.

after sewing each space, put your hook in to make sure it fits
Once you have all your spaces done, and all your hooks fit, set it aside.

4. Take your two fabric pieces for the strap and place them right sides facing. Sew around edge using edge of presser foot as a guide leaving a space for turning. Turn right side out, topstitch around edge. (I actually forgot to topstitch around mine! Whoops!)

5. Take piece A, right side up and lay your strap onto one side 10.5cm down from the top and 7cm in as shown:

Pin in place then sew strap on. I sewed a 3cm x 3cm square to secure it. (Your loop tape will be sewn over the top)

6. Lay your two pieces of loop tap side by side over the square you just made. Pin and sew in place.


7. Take your hook tape pieces and sew them on the underside of the strap ( as I mentioned before, I've used blue thread so you can see my stitches, be sure to use a corresponding thread on your own project!)


8. The lucky last step! Place pieces A and B right sides facing and sew all around the outside edge leaving a 2 inch gap for turning. Note: Make sure you tuck the strap safely inside your work and pin it in place to make sure you dont sew over it! . Turn right side out, press, then top stitch close to the edge the whole way around and you're all done!! Pop your hooks in, roll up and enjoy!


I crocheted a quick little flower and glued it on the strap for that little something extra!

Friday, 30 March 2012

I love being a craft-a-holic!

My name is Tash and i'm a craft-a-holic!

There, I've confessed! Your turn! :p


I've been a busy bee these past few days immersing myself into various little projects! Nevermind the housework or the cooking or the taking care of my sick husband...actually that's not entirely true, I have been taking care of my sick husband but the housework and cooking duties have suffered. I needed to do the important stuff first!

So let's see, what have I been up to? Well, I started making granny squares for a blanket Im making for my grandmother to send to her this winter. I have to say I now fully appreciate the time and effort that goes into these things!! I'm not a particularly fast crocheter...you know, not one of those people who you can sit and watch and a blanket magically appears growing inch by inch every second...nope that is definately not me! I can't predict how long it will take me to finish, but I enjoy the process.


So far I've joined enough squares to get the width of the blanket i'd like, and now it's just a matter of crocheting my little heart out! It's a fantastic evening after-dinner (provided I've actually cooked some) activity as I find it very relaxing. It's a gorgeous mint green and chocolate brown colour combo, intended to be a small throw for my grandmothers couch. Granny squares are suprisingly quick and simple! It's the sewing of all the loose ends in that is the time consuming part. I will hopefully have it done by the end of autumn! (fingers crossed!)

I've also found myself getting back into the groove of painting recently! To be honest I haven't picked up my paint brush in almost a year then all of a sudden I have completed water colour paintings in front of me! In following with my 'Journey of Autumn' series I thought I'd be inspired by the colours of the seasons and do some themed artworks. I suprised myself with what I was able to do, after so long I worried I'd lost the skill but all I needed was the right inspiration and some soothing background music and look what happened...


Very rarely do I actually share my artworks with anyone, but this time I decided to post a photo of one of my paintings in an online group, and the amazing ladies (and lads!) were just so supportive and kind towards it that I was inspired to open a business page of Facebook for my art! It feels amazing to finally be able to share my artworks with the world after so long of being told I should! They may sell, they might not, the point is just that you have to get your name out there somehow through crook or through nook, and as far as I am concerned, as long as someone, just one person, is seeing them, regarding them and appreciating them I will be happy. At the very least, with the closing down of my craft shop I am well prepared to tackle Facebook business pages again. It can be extremely competitive, people try to bring you down, and you fight for your place to be recognised. Not this time! This time I've learnt enough to know that my art will ALWAYS come first, and that I do it for the love and joy of it and not for the sake of anyone else. What I will always remember is that whilst you may not feel that you are making impact, you may feel that you aren't as good as the people around you, you do what you do because of who you are. If you stick with it, through thick and thin then you will come out the otherside and all of a sudden realise how appreciated what you do is, and that you have created your very own niche, just for you that no one else can take away from you.

My busy bee creations didn't stop there though! I whipped up this fun bright red 'Lil Devil' earflap beanie for a friend of mine who is going through a rough patch at the moment, I thought it would cheer her up a little.


Then went to the park with the hubby one afternoon to play around with some late afternoon photography for Part Four of my 'Journey of Autumn' series...I guess I could give you a little sneak peak :p Part Four is due to be published this Saturday and there are some amazing photographs as we get further into the season!


I crocheted myself a hat in one of my favourite colours to match my cardigan...


and made my first own design patter crochet beret tutorial and on top of all that, yesterday I made my first dress with the most adorable cherry patterned fabric I have ever seen! It was so rockabilly, it was so vintage, it was so beautiful and it just absolutely had to come home with me to be turned into a dress!


I had no pattern but the concept of a pillowcase dress seemed simple enough! Not entirely so... I ended up the first time round making the armholes MUCH too big! I sat for a while pondering how to fix it and eventually deducted that the easiest way would be to cut about 4 inches off the top of the dress and re-sew the tie in...solved the problem perfectly! It is really just 2 x 2m wide pieces of fabric sewn together with armholes cut into it and hemmed, which when you add the underbust belt gives the dress that nice flair at the bottom! It is essentially a traditional pillowcase dress, I just chose to use a stiffer fabric instead of something flowing as I am very curvy and didn't want anything that would cling to my lumpy bits! And I am a big fan of vintage AND I love cherries so this turned out perfectly! It will be my birthday dress for next Saturday (my birthday falls on Easter Saturday this year!) so now all I have to work out is what kind of vintage hair do to go with it and a headband with my remaining fabric.

It really was a very simple dress to make! I am working on a tutorial for it the same way I made mine so keep an eye out for that one!

Naturally to find inspiration for accessories and hair dos I went on another Pinterest Peruse!


Source: google.com.au via Tash on Pinterest


Source: google.com.au via Tash on Pinterest


Source: wanelo.com via Kristel on Pinterest


The only thing is that on top of all this craftiness that will continue to happen over the next week we are expecting visitors at the same time in our tiny unit! I guess my house-wife duties will have to kick back in at some point! We have a friend staying with us a few days this week, family staying with us over Easter and after that another family member coming to visit for a few days after that! Busy busy busy! I was also hoping to get a few sketches in aswell, but that might have to wait!


Thursday, 15 March 2012

Pillowcase dress, my first try!

Well today I finished sewing up my first ever peice of clothing! I have made a skirt before, but that was completely hand sewn (actually I need to sew the hem on that still..whoops!) It's only a little peice, newborn to be exact and the whole dress cost about $3 to make as I picked up the fabric at the local op-shop for 50 cents and I only used half of it! My printer wasn't working though so I couldn't print the pattern and had to measure the fabric with my tape and draw it up myself and as a consequence I think the armholes are a bit too small. I have now used bias tape for the first time...wonderful stuff isn't it? I also made a matching bow headband for the dress, you know because now cute little vintage dress is complete without a bow right?


I also learnt how to sew on trim properly! It's suprisingly simple, but then again I guess I've never tried to do it before.


I used Prudent Baby for the pattern, it was super easy to follow! I am now plotting ways to go about making one of these dresses on a larger scale for myself! Red and polka-dotty would be perfect!

Monday, 5 March 2012

Knocked the stuffing out of me!

I had lots of blood taken for tests today..'needle'ss to say I am a bit out of it.... the loss of appetite meant I hadn't eaten much which is never a good combo for blood tests! For those of you who are following the goings-on of my mystery illness, I can give you some more info tomorrow when the results for one test comes back, and on Thursday when the rest of the results come in. If they aren't too shockingly serious (which I doubt) and I feel comfortable sharing of course :p

As it turns out it isn't a good time for medical problems! My poor father goes into surgery tomorrow (again) after some complications after his hernia operation. It is a relatively simple procedure and he will be fine with time though. It's horrid when you go in for surgery for one part of you and it heals up perfectly but then the process causes something else to go wrong! Lots of love and best wishes will be going his way for tomorrow!!


Amidst all this awful news and dissappointing doctors appointments... there was a new baby bought into the world yesterday! My very old friend whom I have known since primary school gave birth to a beautiful baby girl whom she has named Shyloh which I think is just gorgeous! 19 hours of drug free labour and I think she has done an amazing job! My sister in law is due for her baby within the next couple of weeks and also a good friend here in Armidale is due for her little sweet bundle of joy on Wednesday! So many new babies and many new happy mothers! There are more to come this year too! Another 4 of my friends are expecting their first baby, second baby, and even their fourth baby this year so hopefully all goes well for them too! As for me, no babies yet...someday though!! Or sooner than I expected depending on all these tests! (but I doubt that too)

My crochet blanket which I started a few days ago is making slow progress..it currently have 5 squares completed (only a million more to go! or so it seems) in chocolate brown and mint green and I'm thinking I'm going to throw a bit of pale blue and purple in the mix aswell. We'll see how far I get with it first :p Especially with my track record of not finishing anything.

There was one thing I did manage to finish today though...I whipped it up in about 2 hours total; it's my first time and I didnt have a pattern so excuse the slight wonky-ness of it..I kind of just cut out bits and hoped they'd go together! Anyway...meet 'Scraps', my aptly named scrappy stuffed bunny!


The neck tie is cute right?! I actually made a mistake and used it to cover it up... but shhhhh

Oh!!! Also! Let me leave you with this handy household tip...

'Handy Household Tips Number 1 : How to make your bathroom glisten and sparkle with hardly any effort whatsoever!


...throw glitter at it!'