Showing posts with label Fabric Flowers. Show all posts

Friday, 8 March 2013

Star stitch, fabric flowers and a beautiful blanket

My latest crafty escapades are definately not that glamorous but I have been doing a little bit here and there which is better than nothing right? I learnt a new crochet stich (the star stitch) which is groovy, takes a while to work up but looks great! I'd intended to make a start on my new autumn newborn prop range but with this flu it's been baby steps here and there. Definately looking forward to trying this one out again in a larger hook size (used a 5.5mm here) and a thicker ply yarn for a different effect.
I also whipped up some quick little fabric flowers to keep myself in the groove, there is nothing much in the crafting world I love more than fabric flowers yet I hardly ever take the time to make them! Sad really! I have a WHOLE PINTEREST board dedicated to them for cryin' out loud! I am in DESPERATE need of a project that involves oodles of these little beauties! Any suggestions? :o)
Then there is my ongoing mega-crochet project! This poor blanket has a very long way to go, I feel like I've been working on it for an eternity. One of my close friends asked for a blanket to made for her daughter, I feel so awful that I haven't finished it but first it was all day morning sickness, now it's the flu...I've had no luck! I am hoping to spend the better part of this weekend just working on it :o) It will be edged in white (once it's done), with white hearts appliqued and the little girl's name added in crochet letters (which I'll be learning how to do soon) I'll just keep swimming, I'm sure I'll get there soon! It's a good thing I have very understanding friends! I can't really show you more than this peak, I don't want her to see the whole thing til it's all done ;)
 
It's a Friday night and I think I'm going to nestle down on the lounge, keep up my fluids and watch Bob's Burgers....good plan methinks! Happy weekend everyone! I'll be back blogging later on in the week...12 week scan on Wednesday!! YIPPEEE! 

Monday, 3 September 2012

This is why I am the Q.C Shmoogle Bean!

Want to see the kind of crafty things I've made in the past pre-blog?? All the things you are about to see are why I started this blog in the first place... Because even though I no longer sell my crafts, even though I don't have my shop and probably won't again for a long while until I can afford it again...Instead I am going to create a FREE tutorial for every single one of the things you see in this post! That is my mission, that is my dream and that is what this is all about! And you know the best part? That you are here with me on my journey, whilst I sort out my life, my feelings, my career, my family, and everything else inbetween along the way :o) All these pretties are things that I have made pre-Pinterest, pre-blog, most without a pattern and most before I had my sewing machine... looking back I am SO proud of myself for getting as far as I did.

Are you ready? :o)

*Every single one of these photos are my property. Every item shown is a creation of mine, PLEASE do not take these photos and use them elsewhere/claim them as your own. Help me keep my tutorials free and respect the work of others*


And that's just some it it!!!

Crafting is my life!! Any particular thing there you'd like to see made into a tutorial first? :o)

Thursday, 2 August 2012

Sneak Peaks and Sweet Eats

1. Calling fellow quirky geeks! Sneak peak for my celebration 50 followers giveaway... it's totally zombilicious, and has a lot of work to go before I can start the giveaway...stay tuned Beans! You're gonna LOVE this one!

2. Here's the floral headband I made last night to satisfy my craft-craving... it's b-e-a-utiful and I can't wait to wear it!

3. I finished my Solomon's knot wrap yesterday, and that's one more gift in my Handmade Challange completed! The photo doesn't do it enough justice, it's so pretty!

4. Im going shopping tonight for ingredients for a little tea I'm hosting Saturday morning for a fellow quirky bean who has just found out she's expecting and thought I'd make some of these
Source: google.it via Tash on Pinterest

I'll check in tomorrow with my baking progress and some pics :o)

Til next times Quirky Beans!

Wednesday, 1 August 2012

Creation withdrawals...

You know what is really super dooper times a bazillion bugging me at this very second???????

The fact that I haven't tried a new crafty thing of some kind today!! Do NORMAL people worry about this stuff?? Seriously? Or am I insane? It's 10pm at night and I don't feel like I've done ANYTHING today simply because I haven't created something new! I FEEL LIKE I HAVE WASPS IN MY BRAIN! Figuratively speaking.

So now what?????? My brain is still buzzing...possibly from the two beers and tall coffee I had at Trivia tonight (which we lost and royally sucked BUM at by the way) and I absolutely need to do something before I can sleep soundly. BUT WHAT MY FRIENDS WHAT?! *shoots off to Pinterest to scour boards for an idea*
...and is now conflicted. That didn't really help! I could make a new headband or flower but really I have loads of them already... It's a little too late at night to sew, I can't bake and I lack certain supplies for other stuff. Hmmmmmmmmmmmmm conundrum!

Then its hits me...'it' being an idea. I want to make something insanely girly and pretty. I haven't done much of that before...and I don't really have anything like that yet in my vast collection so hey! Let's do that! And what does that consist of??? Flowers and headbands... oh well, one more in my collection can never be a bad thing! So I consulted my 'Flowers of the DIY variety' board and put together a small collection of inspiration that goes something like this:

Source: google.com.au via Tash on Pinterest

And now I am off to dig through my stash of fabrics and lace and ribbons and things to see what I can come up with! And you're just gonna have to wait til tomorrow to see what I made!

Late night creation withdrawal dealt with!

See you tomorrow Beans! Im off to not accidentally glue my fingers together with hot glue....


Tuesday, 29 May 2012

Tartan Gathered Fabric Flower


TARTAN FLOWERS!!! I love them, can you tell??

This is such an easy fabric flower to make! I personally love this style as it looks great as both a fabric flower and can also be made easily with ribbon :o)

All you need is:
  • a needle and thread
  • a large button
  • a length of tartan 10 x 54cm
  • a headband or clip if you'd like to use it as a hair accessory, if not you could pop a safety pin on the back and add it to a handbag or use it as a brooch.
Firstly, fold your fabric in half lengthways. You can press the edge with an iron for a straighter edge if you like but it's not necessary. I'm not very anal when it comes to these things :o)

Take your needle and thread and begin to thread it along the open edge of the fabric about 1/2cm in, tugging the thread taught as you go. This will gather your fabric and create your flower.


Continue all the way along the edge til you reach the other end. Pull the thread tight again then overlap the two edges. Sew the two ends together once or twice to secure your flower.


Sew your button over the centre and do something AMAZING with it!!! Like add it to a headband!

To make the ribbon version, you follow much the same process, but there is no need to fold the ribbon in half, you simply sew along one edge as above.


Sunday, 13 May 2012

DIY Book Making! Not as tricky as it seems!

Today I  happened to come across this in another one of my Pinterest Wanderings...


You might have seen this particular tutorial before...it's very cool in my opinion!!! Fantastic, and very easy to follow! (Thankyou Mr James Darrow!!)  I'm addicted to paper...truly!! I don't know why but I love notebooks, artbooks, blank ruled pages, scrapbook paper, coloured paper, all of it! Give me a blank prettily covered book and I'm in heaven! Of all the strange addictions to have right??! So when I came across this my mind went pinging with thoughts of creating my very own hand bound and covered notebooks! Then I thought, why not make one to keep my craft and recipe tuts in? Great! I read down the list of required materials and my heart sank. I didn't have half of them! Chip board, wax coated string, heavy weight artists' paper (DEFINATELY not something I'd be using for a handmade book if I had it, I've used it before in my drawing adventures and it's quite pricey...well pricey for me and my complete lack of income anyway!), spray-on adhesive... And the half happened to be the most important componants of this tutorial! But, still being eager to try it anyway, I compromised and found alternative materials to work with. Now don't get me wrong, one day I will make a book (after I've had a little more practice) using parchment or something similar and use only a calligraphy pen (ooooh I'm drooling already..try not to picture that it's a bit weird) but in those famous timeless words...today is not that day!

So here's what I did instead!
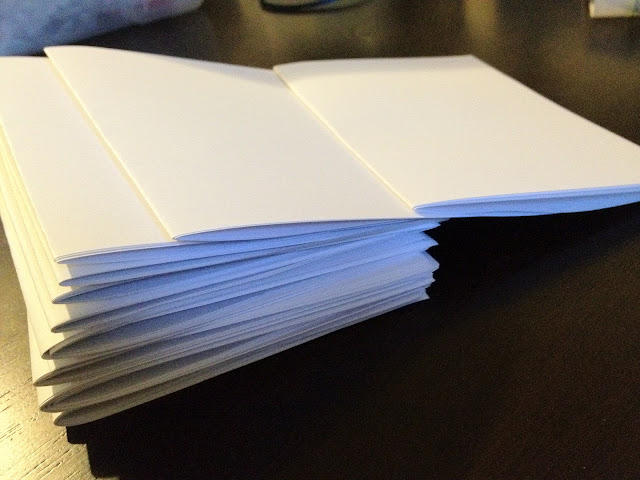
Instead of the artists' paper, I used printer paper and followed the instructions for folding as per the tutorial.
I've seperated the 'signatures' into pages of four for ease of sewing as per the tutorial.... when I cut up my bits of paper, I did it in a haphazard kind of way. In short the edges are a tad wonky. Oh well! It's a practice run :p
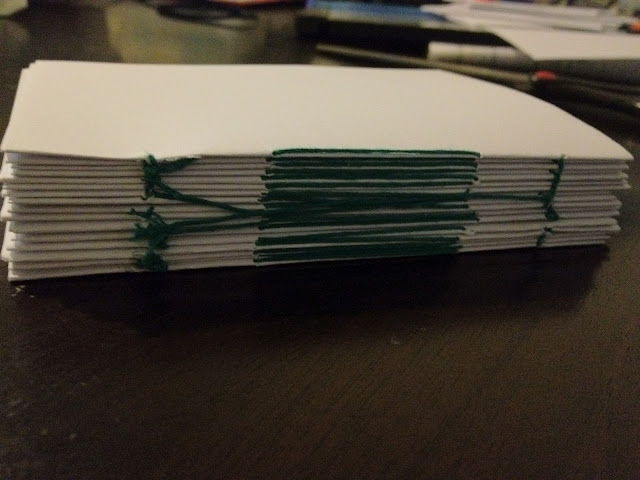
Ok so my binding job is a TAD untidy..I made a few small rips here and there and wove my thread back and force in places to hold it together. I won't see this section in the end anyway. The binding was very simple and not nearly as hard as the tutorial makes it out to be. I'm sure using a more heavy duty paper you won't have tearing...even so, it was so minute with the printer paper that it won't be noticable. Also, instead of the wax coated thread, I just used embroidery thread. It's nice and sturdy and works wonders! Just don't pull it too tight or, as I mentioned, you'll tear your pages. And yes green probably wasn't the best choice but it's all I had around the house

The instructions then call for the use of canvas to cover the sewn binding and provide stability but I just used a piece of cotton drill and it seems to work fine! For all my glueing I am just using a standard glue stick too by the way. If you let it dry thoroughly it's quite secure.

Next comes fitting the pieces for the book cover (front and back) and the spine. It calls for chipboard BUT as I don't happen to have any lying around, I used the cardboard lid from a an old pressure cooker box!
see? :p
My fabric of choice! I love the bold prints!
The make-shift crafty project so far!
Assembling the cover pieces onto the fabric and gluing in place (still with my trusty glue stick!) *NOTE* using a gluestick, fabric and cardboard works BUT you absolutely must let it fully dry before moving on to the next step.
Adding the book block to the cover. Then leave it to dry thoroughly before the next step, you don't want the block to shift out of place whilst applying the paper inserts in the final step ( I learnt that the hard way).

I found the final step to be the trickiest of the whole process! Please don't go flying into glueing down those scrapbook papers into the inside of the covers without carefully measuring first!! Mine turned out a bit wonky and ill-fitting due to the fact I lost my ruler and had to eyeball it as best I could. Also, if you want to hide that drill showing through (on the otherside of the first and last page) simply glue that page to the next one and you won't see it :o)


This is what I mean when I say pay attention to which way around your fabric is before you glue it to anything! This is the back of my book and it was meant to be the front.
My finished (and sideways) book!! It's sideways because for some reason it wouldn't upload the right way around but you get the idea :o)


Do's and Don'ts!
(Panic not my friends! Not all the 'don'ts' are bad ones! Don't let them scare you off!)

DO have immense amounts of fun whilst doing this!!!
DO make as many as you care to and use them for everything as I intend to! Shopping lists, as gifts, journals, recipe books, keep one in your car, handbag, beside the phone....seriously they're just THAT useful!!
DO make one from the original tutorial using all the suggested materials at some stage as I am sure it will turn out a billion times better than mine!
DO make sure your fabric is the right way up/around before you glue it to anything. I ended up not paying attention and the side with the zebras on it that I intended for the front ended up on the back.
DO show me how you went!!! Pretty please!!
DO make a cute little flower for the cover (I used the same flowers from this tutorial) ...seriously it adds that final touch! Gee you would think I was hinting something? Or make matching bookmark with the leftover scrapbook paper...I happen to have a tutorial for one right HERE if you like :o) Nothing like some shameless self plugging!

DON'T forget to place a scrap piece of paper under the page you are glueing the inside cover to or the next few pages might go a bit 'wrinkly' from the moisture. It also helps so you don't glue more pages together than you intended to!
DON'T put this in the 'too hard' basket...I really urge you to give it a try! You'll be suprised how simple it is!
DON'T (or at least try not to) be too impatient and skip the 'let the glue dry' step. It really is very important and will effect your end result so grab a cup of tea and a book whilst you wait.
DON'T be afraid to use your hot glue gun to stick down any bits that come loose. I hot glued the corners of my inside paper covers to be doubly sure they'd stay down and a few pages needed reinforcing too but that was more to do with my dodgy stitching effort.


PLEASE NOTE: I, in NO way claim the original tutorial by James Darrow as my own. It is his own work and all credit for the diy book goes to him. I am not copying his tutorial in any way, merely giving it a go with items I had available to me and inspiring others to use the original tutorial in a more frugal way making it more accessible to us (broke) peeps. As stated on the original source by the original author: "You may use this tutorial in part or whole to teach others, please don't remove my name or URL" Again, a big thankyou to Mr Darrow for all his hard work in producing such a wonderful how-to for us!


Monday, 16 April 2012

Stunning (and easy!) Scrappy Hair Flower


Stunning floral hair accessories are easy as pie! Truly they are!! Today I'm going to show you how to make this stunning hair flower clip using only scraps! It's so drab and dreary in little Armidale today, and that breeze is definately chilly so I thought it's the perfect time to mix some colour into all that grey!

NOTE: For personal/gift use only! You may not copy/sell/reproduce any part of this tutorial. You may not use photos from this tutorial for any purpose; you may not sell any items made from this tutorial. Please respect the time and effort that goes into the production of free craft tutorials :o)

What you will need:
  • A needle and thread OR
  • A glue gun (im lazy so I use a glue gun!)
  • Satin and organza scraps (Im using 4 colours but you can use any colours you like!) *Tip Make sure your satin and organza aren't the flammable kind. Sometimes stretch satin doesn't 'singe' it just burns. Test each piece with a little scrap first to be on the safe side :o)
  • A tealight candle
  • An assortment of little seed beads/ plastic pearls/buttons/ a diamonte anything you like for the centre! I'll be using seed beeds but feel free to use whatever you have on hand!
  • A hair clip/headband/bobby pin or slide that you will attatch your flower to
1. Cut your fabric into circles! For this flower we will be working with layers, make sure your first layer is satin (we'll be singing the edges later) and build up in any order from there. Start with a fabric circle that is about 15cm wide and make each circle after that a little smaller. You will have 11 circles in total. They don't have to be perfectly round...in fact the effect is much nicer with handcut circles. You can even add more or less layers to your flower! It's very versatile and easy to assemble!

2. Begin singeing the outside edge of each circle by holding the fabric above the flame of your candle you will notice the edges beginning to melt and curl * be careful!!!* If you want to give them a bit more texture, you can hold the edges above the candle and briefly put the bottom of the circle to the heat and it will 'pucker' giving the petal a more textured look. Just be careful not to burn a hole through them :o)
The first petal of my flower; the base. See how the edges are sealed and have curled upwards a little? I've also added a bit of texture around the outside of the flower.
3. Begin layering up your petals! If you like you can sew them on using a needle and thread or you can simply dab a little hot glue and attatch them that way instead. It's up to you!
Layering up!! They don't even have to be centered!
4. Add your seed beads! To do this I added a blob of hot glue to the centre of the flower and just tipped a small amount of beads over the glue patting them in a little with my finger. Once the glue has dried I simply shook off the excess.
You now have stunning handmade hairflower! And it really wasn't as tricky as it seems at first!